


Latest Products
We keep on updating and iterating our products, optimizing the structural design and creating a more scientific and reliable slewing drive device.
-

 Two-stage slewing drive with extended cent...
In response to the customer’s specific requirements for a slewing drive used on automation equipment, U-TRSM ha...
Detailed instructions Send mail -
 Specialised Slewing Drive Solutions For He...
In response to the specific operational requirements of heavy-duty automated rotary equipment, U-TRSM has used its ri...
Detailed instructions Send mail -
 Inner gear slew drives: compact and effici...
In the application scenario of heavy duty automated equipment rotating bases, facing severe requirements such as high...
Detailed instructions Send mail -
 Lightweight design and performance of U-TR...
In the field of high speed automated mechanical equipment, the performance and light weight of the core drive compone...
Detailed instructions Send mail
Installation manual for spur gear slew drive
Publish time:2021/03/24 News 标签:Installation manualslew driveViews:747
# Please read this manual before installing gear type slew drive.
# This manual contains information needed for correct installation and maintenance of the spur gear slew drive.
# All the following work steps require professionals to operate.
# Please contact our after-sales service immediately if you have any technical problems.
1. Transport, handling and storage
1.1 Transport and handling
When transporting, please keep the spur gear slew drive packaging box in the specified direction to avoid collision; please wear work gloves and handle carefully ; spur gear slew drives generally have threaded holes on outer ring and it’s necessary to use three or more lifting rings and lifting device to safely carry the spur gear slew drives.
1.2 Storage
When storing, please keep the spur gear slew drive packaging box in the specified direction and store it in a ventilated and dry place. In a closed package, the product anti-rust cycle is 6 months. If you need to store for a longer time, please take special protective measures.
2. Installation and maintenance
2.1 Installation preparations:
Check whether the spur gear slew drive is physically damaged; clean the spur gear slew drive and connecting bracket, clean up the impurities on supporting surface (such as iron scraps, burrs, paint, welding slags, etc.).
2.2 Clean anti-rust oil on mounting surface of spur gear slew drive:
Use cleaning fluid (such as diesel, gasoline, etc.) to clean the outside of the installation surface. The cleaning fluid cannot damage the performance of rubber seals; please follow the use regulations of the cleaning fluid to protect the staff.
2.3 Bolt selection
We don’t recommend and provide assembling bolts, the following terms are for reference only:
Please select bolt specifications, models and performance grades correctly.
Bolt level is not lower than 8.8.
The length of the bolt screwed into the screw hole is generally 2 times the nominal diameter of the bolt.
The bolts are not allowed to be screwed out of the screw holes, otherwise it may cause interference and damage the parts.
If the contact stress exceeds the allowable mounting surface, please use a suitable high strength washer.
2.4 Bolt tightening torque
The following table is for reference only:
| Bolt specification | Tightening torque(N.M) | Bolt specification | Tightening torque(N.M) | ||||
8.8 | 10.9 | 12.9 | 8.8 | 10.9 | 12.9 | ||
M4 | 2.25 | 3.31 | 3.87 | M16 | 168.00 | 246.00 | 288.00 |
M5 | 4.16 | 6.77 | 7.92 | M18 | 229.00 | 336.00 | 394.00 |
M6 | 7.80 | 11.50 | 13.40 | M20 | 327.00 | 481.00 | 562.00 |
M8 | 19.10 | 28.00 | 32.80 | M22 | 450.00 | 661.00 | 773.00 |
M10 | 38.00 | 55.80 | 65.30 | M24 | 565.00 | 830.00 | 972.00 |
M12 | 66.50 | 97.70 | 114.00 | M27 | 837.00 | 1230.00 | 1439.00 |
M14 | 107.00 | 156.00 | 183.00 | M30 | 1131.00 | 1661.00 | 1944.00 |
2.5 Install spur gear slew drive
Please follow the procedure below to avoid internal stress and installation problems when the bolts are tightened.
1). Add thread fastening glue to the thread
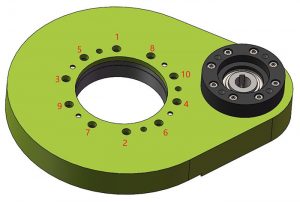
2). Pre-tighten bolts and washers should be tightened crosswise; See the picture below for tightening sequence of the bolts; starting from the inner ring or outer ring, all bolts are tightened diagonally to 30% tightening torque, then repeated diagonally tightened to 50% tightening torque, finally tightened diagonally to 100% tightening torque.
3). The mounting bolts are all installed, no missing installation is allowed. If the bolts cannot be installed due to structural constraint, the bolt holes must be sealed treatment, such as filled with silica gel, otherwise water and dust will enter into the rotary reducer.
4). The installation bolts should consider the thread engagement length, should not be too long, otherwise it will affect the rotation of the slewing ring or cause interference.
5). After the bolts are tightened, please mark the bolt head and its connection area with a line, which is convenient for checking whether the bolts are loose in the future.
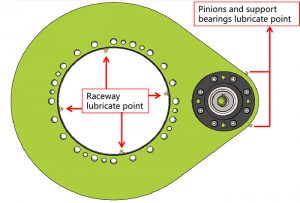
2.6 Spur gear slew drive lubrication
The important parts of the product have been lubricated before leaving factory, normally added Mobil EP2 grease. We recommend that you decide whether to add lubricating grease or not according to actual situation during installation.
1). The slewing ring raceway has been filled with grease before leaving factory.
2). The place where the gear meshes with the slewing ring has been filled with grease before leaving factory.
3). The bearings supporting the gears have been greased before leaving factory.
2.7 Relubrication interval time
The relubrication interval mainly depends on the current working and environmental conditions.
The accurate relubrication interval can only be determined by tests under actual working conditions.
In the absence of a reference, refer to the following table:
Work conditions | Grease-filled lubrication intervals |
| Workshop, industrial positioners (turntables/robots, etc.) | Once every year |
| Difficult conditions in open grounds (crane, wind turbine, solar device, aerial work platform,etc.) | Once every year |
| Severe climatic conditions (sea/desert/Arctic climate/very dirty surrounding/more than 70 continuous operating hours per week) | Once every six months |
| Extreme conditions (tunneling machines, steel mills, oil field) | Once every two months |
To download or print this file, please click download